
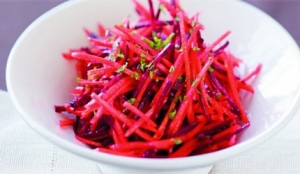
One of my favorite gatherings is the Food as Medicine conference, which brings together hundreds of nutritionally minded physicians, nurses, and other wellness professionals. I cook for the attendees, and while they often kindly tell me how much they learn from me, it definitely goes both ways. In fact, this recipe was inspired by Dr. Joel Evans, who is attracted to nutrition from both a scientific and an aesthetic viewpoint and loves to speak about the colors of food having a tangible relation to their healing qualities. There is a school of thought—and increasing scientific evidence—that the more vibrant the color, the more nutrition there is to be found in a food. As an ode to Joel, I set out to create the most colorful salad I could, using purple beets, orange carrots, and fresh mint. If I'd had a vegetable crisper instead of a box of crayons as a kid, this salad would have been the result. You can substitute lemon or lime juice for the orange juice.
Prep Time: 10 minutes
Storage: Store in an airtight container in the refrigerator for 3 to 5 days.
Serves: 4
Per Serving: 50 Calories, 2.5g Total Fat (0.4g saturated, 1.7g mono-unsaturated), 7g Carbohydrates, 1g Protein, 2g Fiber, 195mg Sodium
Ingredients:
2 tablespoons freshly squeezed orange juice
2 teaspoons extra-virgin olive oil
½ teaspoon minced fresh ginger
¼ teaspoon sea salt
2 teaspoons freshly squeezed lemon juice
1 cup peeled and shredded carrot
1 cup peeled and shredded red beet
2 tablespoons chopped fresh mint
Cooking Directions:
- Whisk the orange juice, lemon juice, olive oil, ginger, and salt together until thoroughly combined.
- Put the carrots in a mixing bowl, drizzle with half of the dressing, and toss until evenly coated. Place the carrots on one side of a shallow serving bowl.
- Put the beets in the mixing bowl, drizzle with the remaining dressing,and toss until evenly coated. Place the beets in the serving bowl next to the carrots for a beautiful contrast ofred and orange.
- Top with the chopped mint before serving.
Recipe from: The Cancer-Fighting Kitchen: Nourishing, Big-Flavor Recipes for Cancer Treatment and Recovery. Copyright © 2009 by Rebecca Katz with Mat Edelson